When it comes to painting projects, the preparation work is just as important as the painting itself. One critical aspect of preparation is sanding, which can significantly affect the final outcome of your project. Using the right sandpaper ensures a smooth, even surface, allowing the paint to adhere better and last longer. In this blog, we will guide you through the process of choosing the right sandpaper for your painting project.
Types of Sandpaper
Grit Levels
- Coarse (40-60 grit): Ideal for removing old paint, varnish, or rust quickly.
- Medium (80-120 grit): Perfect for smoothing surfaces and removing small imperfections.
- Fine (150-180 grit): Used for the final sanding before painting.
- Very Fine (220-240 grit): Ideal for sanding between coats of paint or primer.
- Extra Fine (280-320 grit): Best for achieving a smooth finish on the final coat.
Materials
- Aluminum Oxide: Durable and suitable for a variety of materials, including wood and metal. Ideal for power sanding.
- Silicon Carbide: Sharp and hard, perfect for sanding harder materials like metal and plastic.
- Garnet: Softer and better for hand sanding wood, providing a smoother finish.
Backing Types
- Paper Backing: Common for general-purpose sanding, suitable for hand sanding and light power sanding.
- Cloth Backing: More durable and flexible, great for heavy-duty sanding and curved surfaces.
Choosing the Right Sandpaper
For Surface Preparation
Removing old paint, rust, or imperfections is crucial for a smooth finish. Use coarse grit sandpaper to start, then move to medium grit to smooth out the surface.
For Smoothing Surfaces
Medium grit sandpaper is ideal for achieving a smooth surface before applying the first coat of paint.
Between Coats
Fine and very fine grit sandpapers are used to lightly sand between coats, ensuring each layer adheres properly and the surface remains smooth.
For Final Finish
Extra fine grit sandpaper is perfect for the final sanding, providing a sleek, professional finish for your project.
How to Use Sandpaper
- Sand in the direction of the grain (for wood) to avoid scratches.
- Use even pressure to avoid creating dips or uneven surfaces.
- Keep the sandpaper flat against the surface for consistent results.
Tools
- Hand Sanding: Good for small areas and detailed work.
- Power Sanding: Faster and more efficient for large areas. Random orbital sanders are particularly effective for avoiding swirl marks.
Safety Tips
- Always wear protective gear, including masks and goggles.
- Work in a well-ventilated area to avoid inhaling dust.
- Keep the workspace clean to reduce the risk of fire from dust particles.
Common Mistakes to Avoid
- Using the Wrong Grit: Starting with too fine grit can make the process longer and less effective.
- Applying Too Much Pressure: Can damage the surface and wear out the sandpaper quickly.
- Not Sanding Evenly: Leads to an uneven finish and poor paint adhesion.

Sanding Tools and Accessories
Sanding Sponges
Pros:
- Flexible and conform to shapes and contours.
- Can be used wet or dry.
- Easy to grip and control.
Cons:
- Wear out faster than sanding sheets or blocks.
- May not be suitable for large, flat surfaces.
Uses: Ideal for detailed work, curves, and corners.
Sanding Pads
Pros:
- Uniform finish.
- Often come with hook-and-loop backing for easy attachment to power sanders.
- Durable and long-lasting.
Cons:
- Require compatible sanding tool.
- Can be more expensive than sheets.
Uses: Great for use with power sanders for large, flat surfaces.
Sanding Blocks
Pros:
- Provide a flat sanding surface.
- Even pressure distribution.
- Reusable with replaceable sandpaper sheets.
Cons:
- Less flexible for contours and curves.
- Can be cumbersome for small or detailed areas.
Uses: Perfect for sanding flat surfaces and achieving an even finish.
Sheets of Sandpaper
Pros:
- Versatile and can be used with various tools.
- Inexpensive and widely available.
- Can be cut to size for different applications.
Cons:
- Require a sanding block or pad for best results
- Less comfortable to use by hand for extended periods.
Uses: Suitable for a wide range of sanding tasks, both by hand and with tools.
Side by Side Comparison
Conclusion
Choosing the right sandpaper and sanding tools is essential for a successful painting project. Understanding the different types of sandpaper and their specific uses will help you achieve a professional finish. Whether you are removing old paint, smoothing surfaces, or preparing for the final coat, selecting the appropriate grit and material is crucial.
FAQ: Choosing the Right Sandpaper for Your Painting Project
1. What is the importance of choosing the right sandpaper for painting projects?
Choosing the right sandpaper is crucial because it ensures a smooth and even surface, allowing the paint to adhere better and last longer. Proper sanding helps in removing old paint, rust, or imperfections, and prepares the surface for a professional finish.
2. What are the different grit levels of sandpaper and their uses?
- Coarse (40-60 grit): Ideal for removing old paint, varnish, or rust quickly.
- Medium (80-120 grit): Perfect for smoothing surfaces and removing small imperfections.
- Fine (150-180 grit): Used for the final sanding before painting.
- Very Fine (220-240 grit): Ideal for sanding between coats of paint or primer.
- Extra Fine (280-320 grit): Best for achieving a smooth finish on the final coat.
3. What materials are used in sandpaper and which one should I choose?
- Aluminum Oxide: Durable and suitable for various materials, including wood and metal. Ideal for power sanding.
- Silicon Carbide: Sharp and hard, perfect for sanding harder materials like metal and plastic.
- Garnet: Softer and better for hand sanding wood, providing a smoother finish.
4. What are the different types of sandpaper backing and their benefits?
- Paper Backing: Common for general-purpose sanding, suitable for hand sanding and light power sanding.
- Cloth Backing: More durable and flexible, great for heavy-duty sanding and curved surfaces.
5. What are sanding sponges and when should I use them?
Sanding sponges are flexible and conform to shapes and contours. They can be used wet or dry and are easy to grip and control. They are ideal for detailed work, curves, and corners.
6. What are sanding pads and their uses?
Sanding pads provide a uniform finish and often come with hook-and-loop backing for easy attachment to power sanders. They are durable and long-lasting, great for use with power sanders on large, flat surfaces.
7. What are the advantages and disadvantages of sanding blocks?
- Pros: Provide a flat sanding surface, even pressure distribution, and are reusable with replaceable sandpaper sheets.
- Cons: Less flexible for contours and curves, can be cumbersome for small or detailed areas.
- Uses: Perfect for sanding flat surfaces and achieving an even finish.
8. How do I use sheets of sandpaper effectively?
Sheets of sandpaper are versatile and can be used with various tools. They are inexpensive and widely available, suitable for a wide range of sanding tasks. For best results, use them with a sanding block or pad and ensure even pressure during sanding.
9. What are some common mistakes to avoid when sanding?
- Using the wrong grit.
- Applying too much pressure.
- Not sanding evenly.
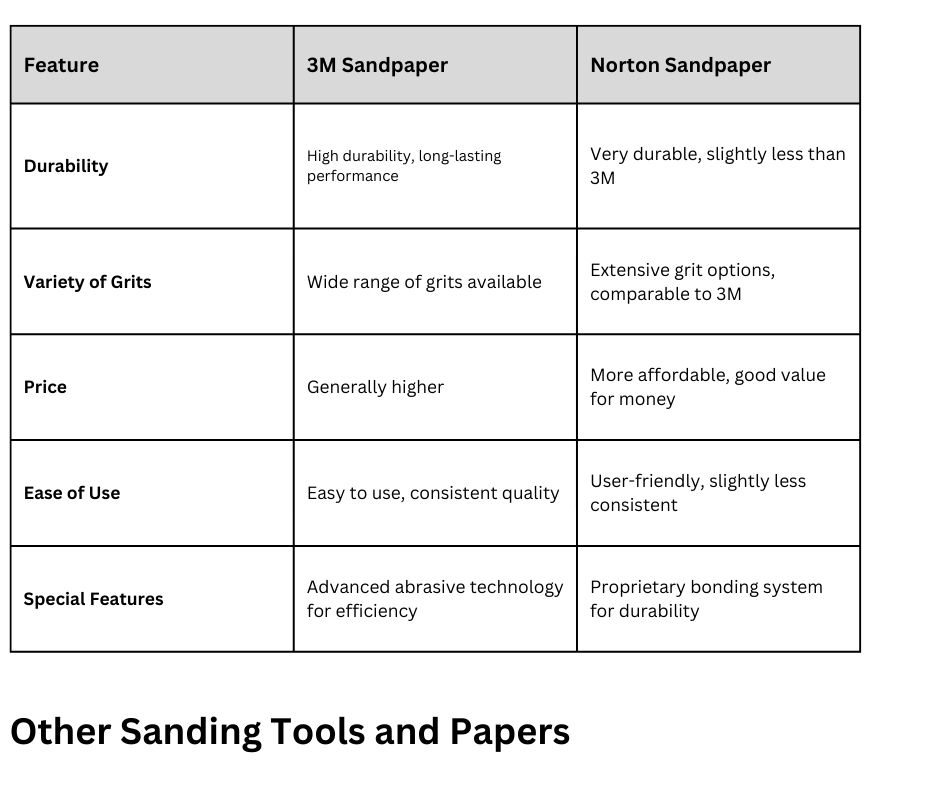
10. How do 3M and Norton sandpapers compare?
- Durability: Both are durable, but 3M generally has a slight edge in longevity.
- Variety of Grits: Both brands offer a wide range of grits.
- Price: Norton is generally more affordable.
- Ease of Use: Both are user-friendly, but 3M is slightly more consistent in quality.
- Special Features: 3M has advanced abrasive technology for efficiency, while Norton has a proprietary bonding system for durability.
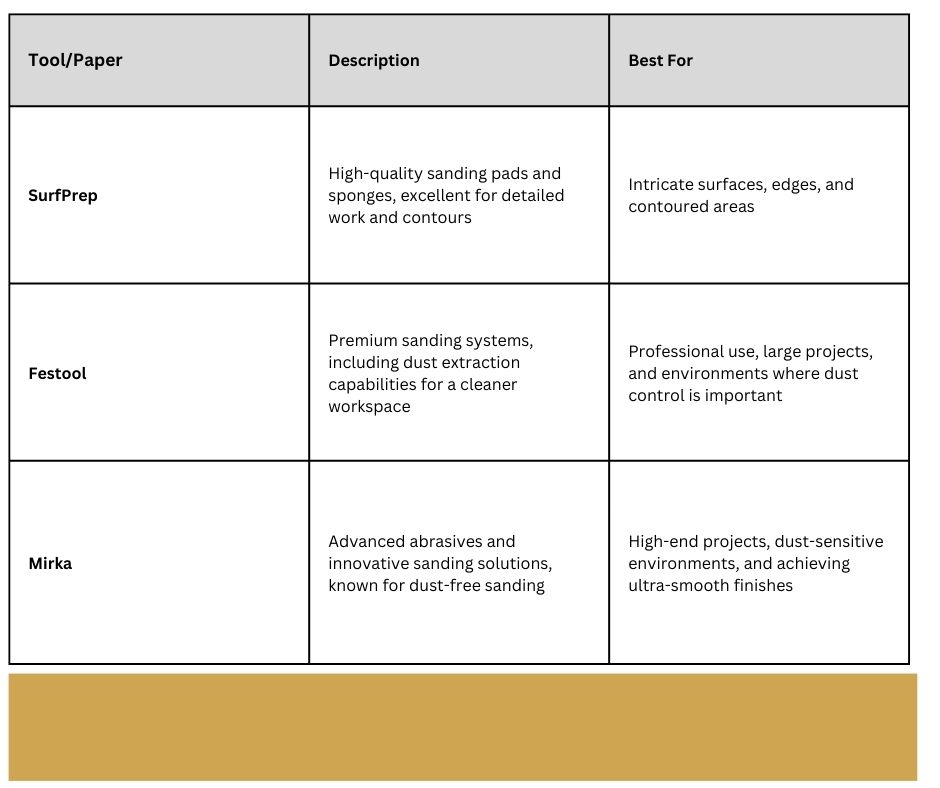
11. What are some recommended sanding tools and papers?
- SurfPrep: High-quality sanding pads and sponges for detailed work and contours.
- Festool: Premium sanding systems with dust extraction capabilities.
- Mirka: Advanced abrasives known for dust-free sanding, ideal for high-end projects.
12. What safety precautions should I take while sanding?
- Always wear protective gear, including masks and goggles.
- Work in a well-ventilated area to avoid inhaling dust.
- Keep the workspace clean to reduce the risk of fire from dust particles.
13. How can I achieve a professional finish with sandpaper?
- Choose the right grit for each stage of the project.
- Use proper sanding techniques, such as sanding in the direction of the grain.
- Use even pressure and keep the sandpaper flat against the surface.
For more information or professional advice and services, contact TRICO PAINTING today!